Monday, December 8, 2014

Christmas Craft Ideas: Handprint Christmas Tree

We've got our decorations up and the house is full of Christmas. The boy-o has been busy making some Christmas art, and one of them has been hung up in his play corner. We made a Christmas Tree out of his handprints, with his name written in block letters as the "stem" of the tree. I'm really pleased with how well it turned out, and the boy-o had a blast painting.


We simply painted his hand in one colour and stamped all of that colour of handprint, and then switched to the second colour and did all of those prints together. After we finished our specific painting project I just let him have at it with the paint which resulted in lots of smiles. 


This was a super easy craft to make and would be a great gift for those hard to buy for grandparents or aunts/uncles that you don't get to see very often. It also looks really cute framed up on the wall. Just remember to write the date on the back so years from now when you're looking at it again you remember when it was made. 

Sunday, November 30, 2014

Christmas Musings: 24 Books for Advent

I have to admit that in the last several years I've really lost that "magical" Christmas feeling. As a kid it was amazing of course, but as I got older I became rather disenchanted with Christmas and the crazy consumer culture that exists around it. I don't like accumulating "stuff" just for the sake of it and I really struggle with the idea of making up Wish Lists filled with things I don't need.

I've noticed this year though now that the boy-o is old enough to have at least some idea of what's going on I'm a little more excited about Christmas than I have been in past years. We've decided to start a new "Advent Calendar" tradition with the boy-o and rather than opening a cheap cardboard chocolate calendar window every day, we've decided to wrap up 24 books (some of them books we already had, and some of them new ones) and every night before bed the boy-o will get to unwrap one to read as our bedtime story that night. There will be one book for each of the 24 days, with the 24th book being "Twas The Night Before Christmas."


Most of the books are winter or Christmas themed but not all of them since we used some books we already had mixed in with some new books. Next year we'll by the second half of them so that they're all winter/Christmas themed. After the 12 Days of Christmas are over we'll put the books away again to save them for Advent next year. We're all big fans of reading in our house, and the boy-o loves books, so this seemed like a perfect way to keep that excitement about books going for as long as possible!

Tuesday, November 11, 2014

Kid's "Busy Bag" Items: Part I

I've decided to take up a new creative enterprise and make up some portable activities for toddlers and young children to use in the car, on planes, at restaurants, in doctor's offices, or any other place kids are expected to sit quietly. I've decided to make up several different little activities that I can put into these "Busy Bags" and then sell them at local craft shows.


The first one that I've made up is something that you might have seen floating around the internet already, and that's the DVD case turned into portable drawing/colouring station. The first one I made was definitely a bit of an experiment, but I think it turned out quite well and is something that I can work with to perfect the pattern for the next one.


I also really love the concept of upcycling and giving old materials new life--especially when it comes to kids stuff since they grow and change so fast.


I think the idea of having something like this to tuck away in your diaper bag/purse/stroller is genius and would definitely make life a little easier sometimes. What do you think?

Monday, November 10, 2014

Beef and Sausage Slow-Cooker Stew

When it gets chilly outside nothing beats throwing dinner together in a slow-cooker and letting it simmer away all day. It's such a relief to come home to a hot dinner that's filled the apartment with delicious smells and is ready when I am. We're trying to use the slow-cooker more, and part of that has been venturing out into stews. I'm not a huge fan of stew because I don't dig chunks of meat like that, but making it myself was a much better experience. I was able to trim the meat to my preferences, and I made sure to dice it into smaller bite sized pieces (rather than the huge chunks you often see--which, I'll admit, gross me out.)

This is the recipe that we used this week:

Beef and Sausage Slow-Cooker Stew:


Ingredients:


- 1/2 cup all purpose flour
- 2 TSP salt
- 1 TSP black pepper
- 3 lbs beef for stew
- 1 can diced tomatoes in juice, undrained
- 1/2 lb smoked sausage, diced
- 3 potatoes, peeled and diced
- 1 cup chopped leak
- 1 cup chopped onion
- 4 stalks of celery, diced
- 1/2 cup chicken broth
- 3 gloves of garlic, minced
- 1 TSP dried thyme

Directions:


1. Combine 1/2 cup flour, salt, pepper, and beef into sealed bag and shake to coat.
2. Place beef in slow cooker, and add remaining ingredients. Sir well and cover. Cook on low 8 to 12 hours, or on high 4 to 6 hours.
3. If stew is too liquidy before serving, add a TBSP of flour to stew and stir well. Simmer until stew thickens and serve!


This delicious stew will go perfectly with a nice big hunk of zucchini and cheese damper too! The meat was so tender it essentially fell apart in the stew making it almost more of a ragu than a stew and it was delicious. 

Wednesday, October 29, 2014

Popsicle Stick Matching and Slot Game

We've been doing lots of activities to work on the boy-o's fine motor skills after hearing that many 2 year old no longer have properly developed fine motor skills from spending so much time playing on phones and iPads. He doesn't get any screen time yet (TV either) but it still concerns me that this could even be a thing, so we do lots of sensory stuff to work on his fine motor skills anyway!

He really likes to match things, and he's quite good at it actually. So our newest game is to take a pile of coloured Popsicle sticks and hand him a colour, and then he finds all the other sticks that are the same colour. (Not colour blind-check!)


I converted an old ice cream bucket into a slotted sorter, and once he's matched up the colours he pushes the Popsicle sticks through the small slots on the lid into the container. Once he slides them all in he likes the sound of shaking the bucket and then asks for them to be dumped out so he can do it over again.

The slots in the lid are just barely bigger than the Popsicle stick, so he has to line them up just right and push them to get them through. For little ones who are just beginning to work on motor control you could make the slots much bigger.


This fine motor activity is great because he'll sit there for 30 minutes sliding the sticks in, dumping them out, and starting over again. There is no mess to clean up and the sticks can store inside the ice cream tub for next time. It simultaneously works on colour recognition, matching skills, and fine motor skills. Eventually I'll get around to decorating the bucket, but for now, it works just the way it is! It's the first toy he's gone for the last couple of mornings after waking up, so it must be a keeper!


Monday, October 27, 2014

Moon Dough/Cloud Sand

After posting my last recipe for play dough, I had several people asking me about Moon Dough (also sometimes called Cloud Sand) so I figured I'd try that out with the boy-o today. You can buy Moon Dough from most toy stores, but really for what you're getting it costs a fortune! Moon Dough is spectacularly easy to make at home, and when stored in an air tight container it lasts for many re-plays.


Not only is Moon Dough super easy to make, it only requires two ingredients (three if you want to get fancy), but it's a wonderful in-expensive sensory activity to do with your little. Moon Dough acts very similar to wet sand, but has a much softer and velvety feel to it. We added a tiny bit of food colouring to the oil when we made ours, and since oil and food colouring don't mix well we ended up with flecks of blue colouring in the sand rather than all blue sand which made a really neat effect.


Moon Dough (like sand) can be quite messy, so we played with it in one of our trays and we put a smock on the boy-o. We had him strapped into the highchair and put the metal tray on top of his highchair tray. It worked out really well and sweeping the spills off the tile floor was quick and easy. 


We added a few Tablespoons and some dishes from his kitchen to enhance our play with the Moon Dough. The boy-o loved scooping it up and dumping it into another container and then dumping it out and starting all over again. He played well by himself for a bit while I finished up making supper, and then I joined in for a bit too. He loved watching it "snow" when I dropped it between my fingers making little flakes of it fall.

Moon Dough Recipe:


Ingredients:

- 2 cups all purpose flour
- 1/2 cup oil
- Food colouring (optional)

Directions:

1. Add a few drops of food colouring to oil if desired and mix.
2. Add oil mixture to flour and using your hands work the Moon Dough until the oil has touched all the flour and made a crumbly mixture that sticks together when pressed firmly together. 
3. Play!
4. When finished store Moon Dough in an air tight container for another day of fun.


Another great rainy day activity or boredom buster!

Wednesday, October 22, 2014

Super Soft No-Cook Play Dough

Play dough is one of my favourite kid's toys to play with. I love squishing it and making little sculptures with it, and then rolling it all back into a ball to play with again another day. The boy-o had never played with it before so I figured it was definitely time to make some for him to try out. I wasn't sure how well he would like the texture, but since we've been trying to focus on sensory activities the last little while, it seemed like a great time to test it out! Making your own play dough is also so simple and cost effective that once you try out this recipe you'll never bother buying it again!

The Cream of Tartar is the secret to making super soft play dough that will still that way for months.


No-Cook Play Dough Recipe:


Ingredients:


- 2 cups all-purpose flour
- 2 TBSP vegetable/olive oil
- 1/2 cup salt
- 2 TBSP cream of tartar
- Up to 1 1/2 cups of boiling water
- Food colouring

Directions:


1. Mix the flour, salt, cream of tartar and oil together in a large bowl.
2. If using food colouring, add desired amount to the boiling water.
3. Slowly add water into dry mixture and only add enough to combine all the dry ingredients together.
4. Allow play dough to cool down for a few minutes and then remove from the bowl and knead with hands several times until the dough becomes workable and the stickiness is gone. If dough is still too sticky add more flour.
5. When you're finished playing, you can store your play dough in a sealed container for up to 6 months. (6 months!)


As I predicted the boy-o was a little unsure about the texture of the playdough, and did his little dance routine where he sort of pokes at something new really quick and then hops around it, and then pokes at it again, and does some more hoping around. (It's pretty adorable and hilarious to watch...) But once he saw mama and daddy playing with it and we grabbed one of his hands and stuck it in the play dough he warmed up pretty quickly.


Once he got comfortable playing with it we brought one of his trucks into the mix. We drove the truck back and forth over the play dough looking at the tire tread marks that it made, as well as whether it rolled better on the play dough or on the floor. 


Then once he was comfortable playing with his truck in the play dough we added in some of the plastic play knives from his kitchen to cut the play dough with and carve pictures and letters into it. In total he sat and played with it for about 30 minutes, and if it wasn't dinner time I'm sure he would have happily sat and played even longer!


This play dough will keep for about 6 months in a sealed container though, so we'll have many more opportunities to play with it another day!

Monday, October 20, 2014

Sorting with Rocks

While I was playing with the boy-o in my parents backyard the other day with rocks from their garden (possibly his favourite thing on earth...) I noticed a black plant tray that was sitting on their driveway and had a great idea. I was thinking back to the pompom and muffin tin activity we did a little while ago, and figured we could make up something very similar with the plant tray and his beloved rocks.


Although there was no colour dimension to the activity this time, there was still differently sized rocks, as well as the auditory pleasure of dropping the rocks into the tray. The boy-o could literally sit and play with rocks for hours, so this activity was of course a huge hit! He loved piling the rocks into the cups and moving them around from one to the other. This activity worked on fine and gross motor skills as well as playing around with textures and sounds.


He even tried to pick up the tray and drag it over to Grandpa to show off his work when he was all done! There was almost no clean up involved in this activity, and the rocks will be there waiting for us the next time we want to play with them.


Sunday, October 19, 2014

Our First Indoor Softplay Experience

We had some really miserable weather the other day with a cranky boy-o trapped inside and we were pretty desperate to find something to do with him that would get us out of the house. If we were still living back in Toronto we could have met up with some of our baby friends for a playdate, but sadly we don't have any baby friends here so that wasn't an option. (oh, how we miss you all!!) So I started looking up indoor playgrounds or soft plays. We had never been to one before, but decided to give it a try to see how it worked out for us.


It was $3.50 for the boy-o to play which was quite reasonable, and even though there still wasn't really any kids his age there, he had a great time and it allowed him to burn off some energy without making us totally crazy! He was a little overwhelmed at first and unsure about what to play with, but he slowly warmed up. They had a special toddler area which was great so I didn't have to worry about him being accidentally flattened by an older kid. They had a huge ball pit, a toddler trampoline, a car-coaster, a marry-go-round, and some stationary cars to rock back and forth on as well as a tiny slide. It was a great way to spend some time playing with the boy-o. 


They have a no outside food/drink policy in effect which I totally understand because they want you to purchase your snacks there. The offerings they had were quite reasonably priced, but none of it was even remotely healthy which annoyed me since you couldn't bring in your own fruit etc. We only stayed for about an hour because by that point the boy-o was exhausted, but with their limited snack selection we wouldn't be able to stay much longer than that anyway since I don't want feed him that kind of junk. So it was great for a short stay and play, but we couldn't make an afternoon of it. It'll be a good trick to keep in mind for the next rainy day!


Saturday, October 18, 2014

Nature Collage: Sensory Play

I saw a friend post this idea a little while ago on her blog: the Natural Momma in Me, and I knew that I had to try it out with the boy-o too! I really love the idea of making a nature collage and since the boy-o has been staying at Nana and Grandpa's during the day the last month or so, he's been spending tons of time outside in their back garden playing with rocks, plants and dirt so I was pretty sure he would love making it too.

To start off with we wandered around my parents garden collecting little leaves, flowers, petals, and bits of plants with different textures and smells. We made sure to get some lavender because the boy-o really likes to sniff it. One of these days I think he's going to sniff it so hard it'll end up going up his nose... but that's another story.


Once we got home we examined our pile of collected plant bits and I attached some Mack-Tack to our balcony door with the sticky side facing out. This was going to be our canvas for the collage. The boy-o was pretty interested in the sticky feeling and kept trying to pick it up. I showed him how to place the flower bits on the sticky surface to hold them there, and he got down to it!


He had a bit of trouble getting some of the leaves to stick since our Mack Tack was pretty cheap and not as sticky as it could have been, but with a little help we got all of the bits up and completed our wonderful nature collage! When we were all done I took a second piece of Mack Tack and placed it sticky side in so it was like our plant pieces were laminated between the two and now we can hang it up next to some of the boy-o's other masterpieces!


This was a super easy activity, that was not only very cost effective, but there was minimal clean-up required. It provided the boy-o with an opportunity to explore the plants around him though and experience some different textures as well as some different smells. This could be an interesting activity to do once each season and then compare them together to see the different kinds of plant bits you could forage.


Monday, October 6, 2014

Sensory Play: Pompoms and Muffin Tins

It's been a while since we've tried out any new sensory play activities, so I wanted to share our latest exploration with you. I've discussed the immense value of sensory play before and shared some helpful tips on how to make your own sensory toys like sensory bags, sensory bottles and a sensory tube; and of course don't forget the awesome-ness that is Magic Mud.


For a quick sensory activity that doesn't require much clean-up, the pompom one is something I'd recommend. I took a large package of multiple sized and coloured pom poms and dumped them out on the floor. The boy-o had some plastic cups from his play kitchen and I gave him two differently sized muffin tins--an extra large one and a super small one. He had a great time moving the pom poms from one tin to the other and dumping them out. He loved the soft fuzzy feeling of them, and actually spent the rest of the evening clutching onto one of them that he wasn't willing to part with! We sorted the pom poms by colour and by size into the little cups, and when we were finished we put the pompoms back into the bag for another day.


This simple activity helped to work on hand-eye coordination, fine motor skills, sorting skills based on size and colour, and poms poms are wonderfully soft and fuzzy to touch. We also did the same activity using the dyed pasta that we made. Although the pasta was all the same size, so lacking in that sorting category, it made a lovely clinking sound when dumped into the trays and when being moved from one muffin spot to another.

Get creative and see what other materials you can use! What's your little's favourite item to sort and engage in sensory play with?

Monday, September 29, 2014

Pumpkin Pancakes

I love cooking and I love pumpkin... so you guessed it, that means we make a lot of pumpkin flavoured things around here! Our most recent pumpkin treat was pumpkin pancakes. Made from scratch these pancakes are wonderfully healthy, deliciously moist, and they freeze and re-heat well too. It's also a great way to sneak some extra veggies into your little ones!

These pancakes are a big hit with the boy-o too because he loves finger foods and being able to feed himself. Because of all the spices in them they're quite flavourful even without any toppings added.


Here's the recipe:

Pumpkin Pancakes


Ingredients:

1 1/2 cups all-purpose flour
3 1/2 teaspoons baking powder
1 teaspoon salt
1 teaspoon cinnamon
1/4 teaspoon nutmeg
1/4 teaspoon allspice
1/4 teaspoon ginger
1 Tablespoon sugar
1 cup canned pumpkin purée (not pumpkin pie filling)
1 1/4 cups whole milk
1 egg
4 tablespoons unsalted butter, melted
Vegetable oil

Directions:

1. Sift together the flour, baking powder, salt, cinnamon, nutmeg, allspice, ginger and sugar in a large bowl. Set it aside.
2. In a separate bowl, whisk together the pumpkin with the milk, egg and melted butter. Slowly add the wet mix into the dry ingredients and stir to combine. Allow the batter to rest at room temperature for 20-30 minutes.
3. Heat a large frying pan over medium-low heat and add just enough oil to coat the bottom of the pan, allowing it to heat for 2 to 3 minutes.
4. Cook pancakes of your desired size until bubbles appear in the center, then flip them once and continue cooking until no longer doughy in the center.


These pancakes are amazingly delicious with some maple syrup added on, but you can play around to find your favourite flavour combinations. And don't forget, you can freeze any leftovers in a freezer safe food storage bag and simply pop thawed pancake into the toaster to re-heat them.

Saturday, September 27, 2014

Fall Fun: Pumpkin Patch

Last weekend we started off Fall right by taking a trip out to a pumpkin patch. We had a lot of fun, and they had all kinds of neat decorations made with hay bales and signs. The boy-o loved running around in the field and he kept trying to pick up the pumpkins with his strong man grunts. The pumpkin patch also had all kinds of varieties that I'd never seen before--some of my favourites were the "warty pumpkin" and some gourds that looked like flowers and jelly fish.


They had hay bales painted to look like different things too. They had a rooster one, a spider, a group of three pumpkins, and some angry birds ones! Definitely some creative decorations for sure. They also had a corn maze and a pumpkin lawn bowling section where you tried to knock down 2L pop bottles by rolling a pumpkin at them!


My sister was down visiting last weekend, so we made a big group family trip out with my parents too. They provide you with huge wagons to load your pumpkins in, and the boy-o was pretty determined that he wanted to help push!


And like all good farms they had some painted cut-outs too! We look pretty spooky don't you think?


It was a really great way to start off the Fall season for us, and hopefully we'll get a chance to go apple picking sometime soon too. We've already put some of the pumpkin to good use making pumpkin pancakes! Mmmmm..... 

Friday, August 8, 2014

More from the #TestKitchen: Broccoli Cheese Bites

It's been a while since I've gotten a new post up and I'm duly ashamed. It's been a crazy summer and we're getting ready to move at the end of the month. But today the urge struck to try out a new kitchen adventure, and it turned out SO delicious that I couldn't help but set aside some time to come and share it with you!

The recipe is super simple and the result is just too good.

Broccoli Cheese Bites 


Ingredients:

  • 2 cups of broccoli, steamed and drained
  • 1/2 cup of shredded cheese
  • 3 eggs
  • 1 TSP Montreal Steak Spice
  • 1 cup Stove Top Stuffing Mix

Directions:


1. Pre-heat oven to 375 degrees.
2. Mix all the ingredients together in a large bowl.
3. Scoop out 1/4 cup of the mixture, and with your hands, form small patties and lay on a parchment lined baking sheet.
4. Bake for 25 minutes, flipping them after the 15 minute mark. 
5. Let cool and enjoy.


These are super amazing dipped in Ranch salad dressing, but are also quite good on their own too. They're also perfectly sized for little fingers, and your toddler will love feeding themselves these veggie packed bites. You could even get creative and add some bacon bits into the mixture to make it more of a complete meal.


Another #TestKitchen success story!

Thursday, July 10, 2014

Cauliflower Pizza Crust: Test Kitchen

I'm all about trying new foods, especially when it comes to new ways to sneak some veggies into your meals, but when my brother-in-law mentioned his interested in trying out cauliflower pizza crust I was pretty skeptical. I hate cauliflower. There is no way I enjoy eating it--not raw with dip, not cooked in cheese sauce, not in any way! But he peaked my curiosity, so as a spur of the moment thing we decided to have a family cooking adventure and try making some cauliflower pizza crust! And I am amazed to say that is was actually quite good!! So my gluten free friends, take heart!


Gluten Free Cauliflower Pizza Crust


Ingredients:


- 1 small sized head of cauliflower - should yield approx. 3 cups once processed
- 1/4 TSP salt
- 1/2 TSP dried basil
- 1/2 TSP dried oregano
- 1/2 TSP garlic powder
- 1/4 TSP chili flakes
- 1/4 cup shredded parmesan cheese
- 1/4 cup mozzarella cheese
- 1 egg

Directions:

1. Place a pizza stone or baking sheet into the oven at 450 degrees to pre-heat it.

2. Wash and dry a head of cauliflower. Using mostly florets (you don't need much stem), pulse in blender or food processor until you have what looks like cauliflower snow. You will need between 2 and 3 cups, and the closer to three cups the better.


3.  Place the cauliflower snow in a microwave safe bowl and cover. Microwave for 4 minutes. Dump cooked cauliflower out onto a clean tea towel and allow to cool for a bit. Once cooled, wring out as much water as possible from the cauliflower. This takes some time and effort, so keep wringing! Getting as much water out as possible will help prevent your crust from crumbling apart on you when you go to eat it. 

4. Once wrung out, add cauliflower snow, both cheeses, herbs, salt, chili flakes and egg into a large bowl and mix well. Using your hands works best at this step. Mix "dough" well and form into a loose ball with your hands.

5. Place dough onto greased parchment paper and press down and out into a thin circular shape that will form your crust.


6. Now you're going to bake your crust! Remove your pre-heated pan from the oven and place your greased parchment paper on top. Put crust into the oven and bake at 450 for 8-11 minutes or until golden brown. 


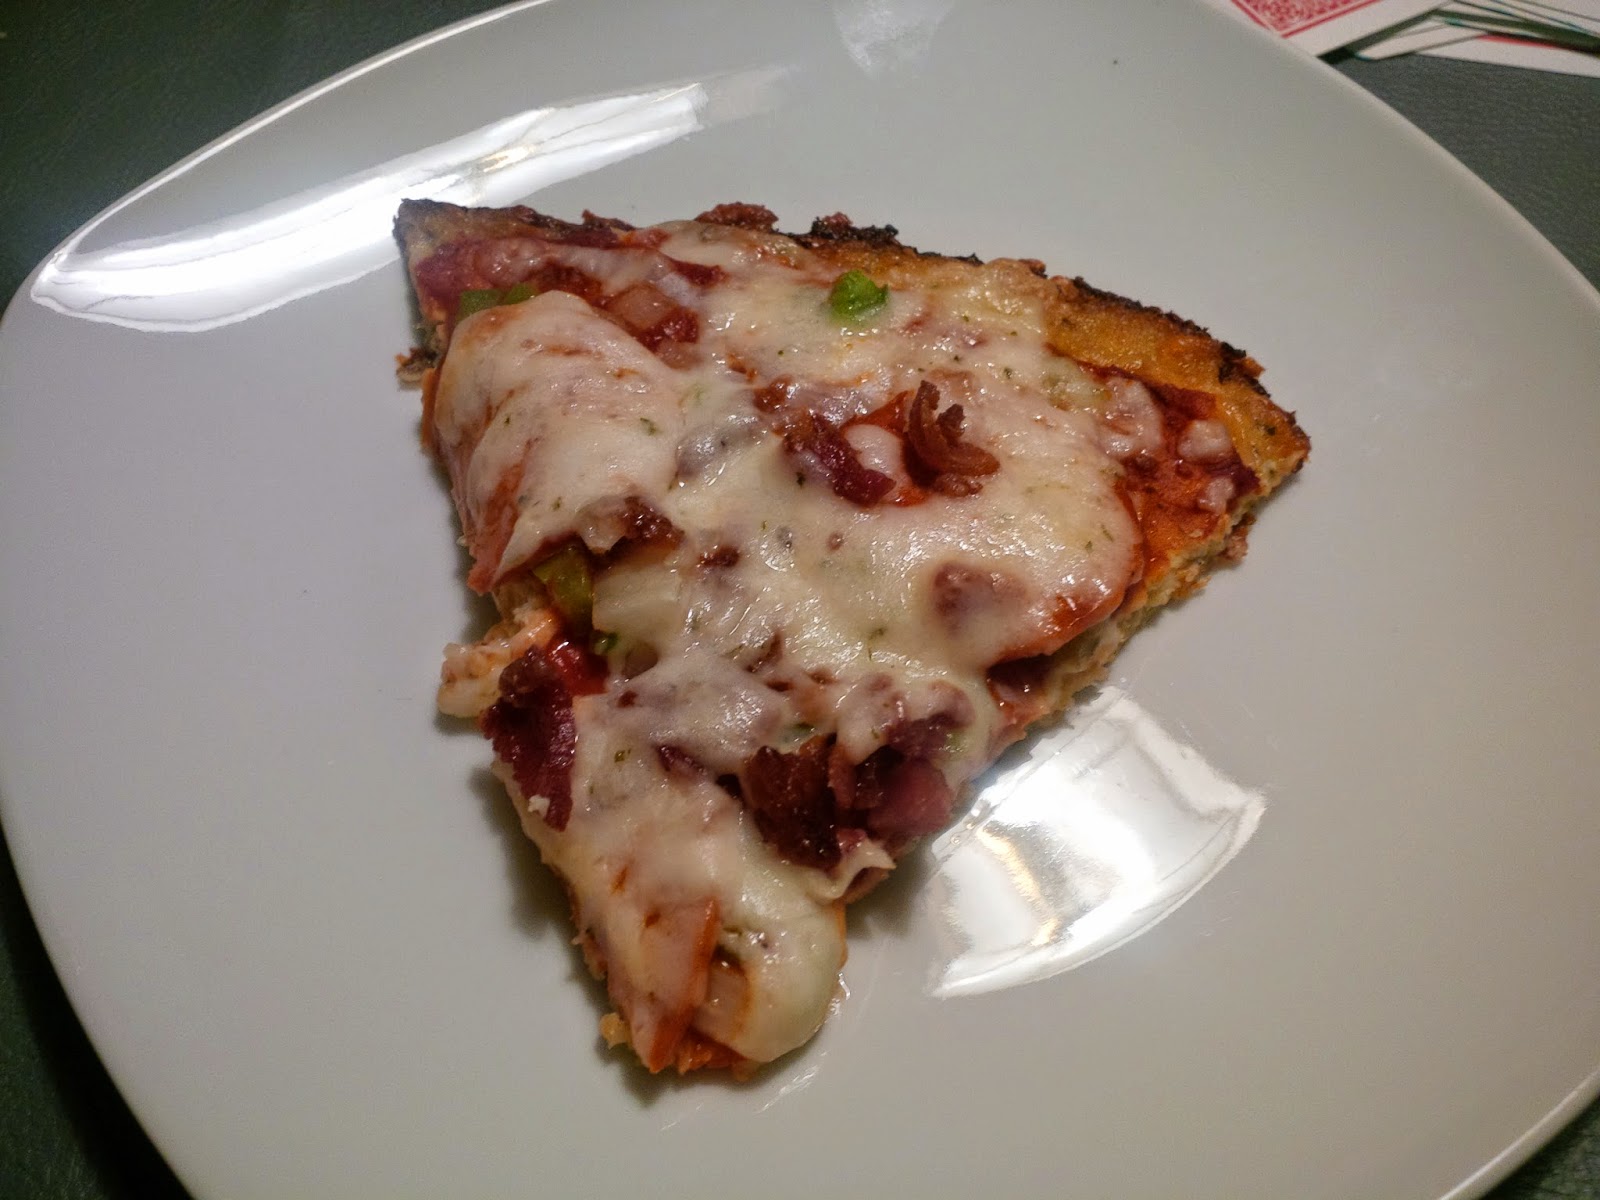
7. Once your crust is done, you can top as you would a regular pizza! We added some sauce, pepperoni, bacon bits, onion, green pepper, and of course more cheese! Return pizza to the oven and bake till cheese is melted and bubbling.

8. Allow your pizza to cool for a few minutes, cut into slices and serve!


Friday, June 27, 2014

Rhubarb Oatmeal Muffins

Rhubarb is overflowing in my parents' garden right now and one of my fondest memories as a kid is walking around eating stalks of raw rhubarb with a little bowl of sugar to dip it in! It's pretty tough to beat fresh produce straight from the garden. My parents gave me a bunch last weekend when we were there visiting and I decided to make it into some muffins to see if the boy-o would like the tangy tartness or not. They were definitely a success! Hubby likes them a lot too.

Note: These also freeze really well, and make a delicious breakfast muffin! And your little toddler will loving being able to feed themselves, and you know you can feel good about what they're eating!


Rhubarb Oatmeal Muffins:


Ingredients:

- 1 1/4 cups quick-cooking oatmeal
- 1 1/4 cups all-purpose flour
- 1/2 teaspoon salt
- 2 teaspoons baking powder
- 1 teaspoon cinnamon
- 1/4 teaspoon nutmeg
- 1 cup brown sugar
- 1 cup strawberry greek yoghurt
- 1 egg
- 1/2 cup unsweetened applesauce
- 1 teaspoon vanilla
- 2 cups rhubarb, chopped


Directions:

1. Preheat the oven to 375 degrees F.
2. Mix the oatmeal, flour, salt, baking powder, cinnamon, and nutmeg well in a large bowl.
3. Mix the brown sugar, greek yoghurt, egg, applesauce, and vanilla well in a medium bowl.
4. Pour the wet into the dry and fold until about halfway mixed.
5. Add the rhubarb and fold until just combined.
6. Portion into a greased muffin tin and bake for about 22 minutes.
7. Cool in the pans for 10 minutes before removing to a wire rack. This is important!! As the rhubarb cooks it will make extra moisture, and allowing it to sit in the hot pan for a while helps to remove some of that extra moisture.


Tuesday, June 24, 2014

Fireworks Craft: Canada Day Art

With Canada Day coming up this weekend I decided to make some festive art today with the kiddos. We made did some "Firework" paintings! These were super easy to make and they don't require very many materials. All you need is some black paper; some paint: red, orange and yellow; 3 pipe cleaners per child; and some sparkles and glue which are optional.

To make this craft you need to fold the group of three pipe cleaners over in half and about two inches from the bottom twist them all together and then fan out the ends into a star shape. You can open up the loop at the other end a little bit to make a nice handle. This will be your paint brush!


Once you have your pipe cleaner brush made you're all set! Simply pour out some paint on a tray and dip the fanned out end of the pipe cleaner into the paint. Press it down on the paper, turn a little bit sideways and press again, and if you want a fuller look you can turn and press a third time. Do this with each of the colours! I just used the same brush for all of them. Behold your fireworks!


For a little bit of added flair if you'd like, you can also add some sparkles to the fireworks. Simply spread a small amount of glue in the center of each firework with a few lines out into the edges of the fireworks and shake on your sparkles. 


Although we made these firework pictures to celebrate Canada Day, you can make them for any holiday or festival where you live. This craft is especially fun for little ones who might be afraid of real fireworks but who don't want to miss out on the party.

BOOM!